Overview
/*<![CDATA[*/ div.rbtoc1770892094223 {padding: 0px;} div.rbtoc1770892094223 ul {list-style: disc;margin-left: 0px;} div.rbtoc1770892094223 li {margin-left: 0px;padding-left: 0px;} /*]]>*/ Overview Creation of a Polymorphic Structure General Information Step 1: Create CR for New Block „Signal Channel" Step 2: Create CRs for Specialized Blocks Step 3: Create CR for New String Property Type Step 4: Create CR for New Coded Value List Step 5: Create CRs for New Coded String Step 6: Create CR to Assign Created Coded Value List to the String Property "… Type" Step 7: Create CR to Assign String Property "… Type" as Sub-Class Property of Main Block Step 8: Set Sub-class Property in CR for Assignment Property to Block Step 9: Create CRs for new CVAs Step 10: Create Reference Property Pointing to the Polymorphic Block Creation of Advanced Polymorphic Structures General Information Step 1: Create One or More Values with Data Type "Reference" Pointing to Specialized Block(s) Step 2: Create Value List of Data Type Reference Assign Reference Value(s) to Reference Value List Assing Reference Value List to Reference Property Assign Reference Property to Block
Creation of a Polymorphic Structure
General Information
User wants to create a polymorphic structure.
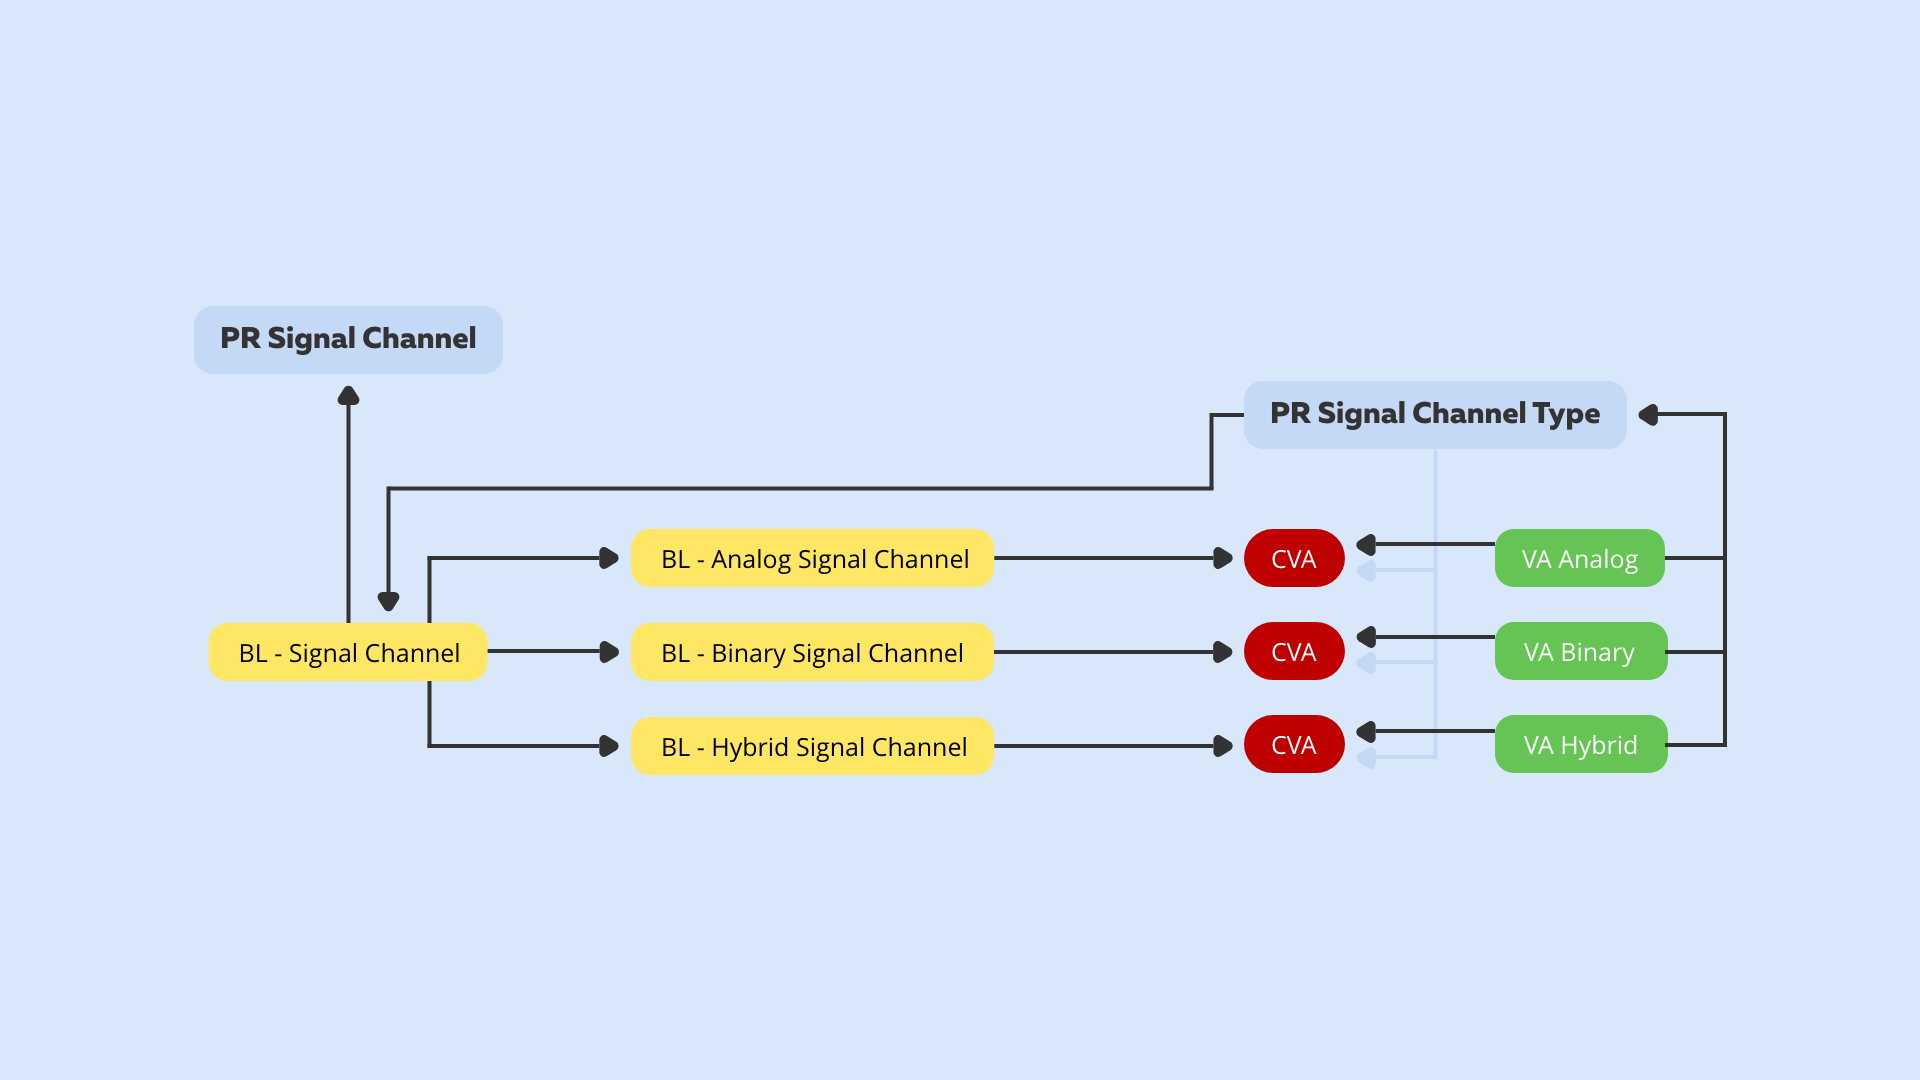
The structure below represents an example of Super Block "Signal Channel" with its property "Signal Channel Type" pointing to one of the 3 specializations of block "Signal Channel"
Step 1: Create CR for New Block „Signal Channel"
Under menu entry Block, select function Create Block. System opens the hierarchical structure of blocks. Select node and press button Select.
In the Create Block Dialog, fill in the fields and Press button Save.
The CR for new block "Signal Channel" will be saved.
Step 2: Create CRs for Specialized Blocks
Change requests for new specialized Blocks will be created by setting as parent the block "Signal channel".
Under menu entry Block, select function Create Block. System opens the hierarchical structure of blocks. Select new created block "Signal Channel" as parent block
and then create CRs for the following specialized blocks (sub-blocks):
-
Analog Signal Channel
-
Binary Signal Channel
-
Hybrid Signal Channel
Step 3: Create CR for New String Property Type
Under menu entry Property, select function Create Property and then button "Create Property". In the Create New Property Dialog, select data type of property "String", fill in the fields and press "Save". The CR for the new Property "Signal Channel Type" will be saved.
Step 4: Create CR for New Coded Value List
Under Value List, select function Create Value List, press button Create Value List in order to create a CR for a new coded value list ("Signal Channel Type"). Under Value Specification select entry "Coded", fill in the fields and then press button Add in order to perform Step 5: Create CRs for New Coded String Values "Analog", "Binary", "Hybrid"
Step 5: Create CRs for New Coded String
In the Create Value List Dialog, press button Add. In the next dialog, press button Create Value in order to create the 3 specified values: Analog, Binary and Hybrid of type "String".
After entering the data for the first value (Analog), press Save. The CR for the new value (Analog) will be saved and the New Value List Dialog will be displayed again.
Press again button Add and proceed as described above in order to create the next value (Binary) and then the last value "Hybrid".
After all 3 values were created, press button Save in order to save the coded value list "Signal Channel Type".
Step 6: Create CR to Assign Created Coded Value List to the String Property "… Type"
Under menu entry Property, select function Assign Value List. In the next screen, select CR for new String Property "Signal Channel Type" by clicking on it and then the CR for new Value List "Signal Channel Type" and then press Save.
Step 7: Create CR to Assign String Property "… Type" as Sub-Class Property of Main Block
Under menu entry Block, select function Assign Property. In the hierarchical structure, select block Signal Channel and press button Select. In the next screen, select CR for new string property "Signal Channel Type". The system will display the Assign Property to Block dialog:
Step 8: Set Sub-class Property in CR for Assignment Property to Block
Create CR to Assign String Property "… Type" and set it to Sub-Class Property of Main Block.
In the above dialog, select check box "Sub-class property" in order to set the property "Signal Channel Type" as sub-class property -> by doing these, the property will be inherited as polymorphic selector to all sub-blocks of the parent block "Signal Channel". In the final polymorphic structure, this property will be used to select the constant value which controls the display of polymorphic sub-blocks.
Afterwards, press Save in order to save the CR. In the hierarchical structure, the property "Signal Channel Type" will be displayed under the specialized blocks of the parent block "Signal Channel".
Note: Simulation Nodes - Clarification on Existence of "Used Property Simulation" Folder
The simulation nodes for used properties and values run the simulator under the node.
Currently the user can visualize structure as it is and right beside it one can see structure as it will appear as soon as the CRs are released (= simulation). The presence of these kinds of nodes allows future options, taking into consideration the possibility that the user can click on the simulation node and have a bunch of controls on the detail pane where additional simulation parameters could be input such as: specific statuses, work packages, etc.
Note: Explanation Nodes - Clarification on Existence of CR Nodes
Another feature of the simulation sub-tree is represented by the explanation nodes. These are CRs nodes displayed under a certain property which have "?=" prefix and which explain the sequence of CRs that, when released, would produce the presented assignment. This is a real helpful feature when testing chain replacement, when user does not have a chance or the know-how to run explanation SQLs, so he has the explanation nodes instead.
Currently, the simulator is called in tree in a special folder. It can no longer run on top of normal nodes. In case of multiple causes, these appear under the simulated property with "?=".
Note: Handling Used Property Order Index
Change Management is able to handle used property order index.
Note: Handling Value Order Index
The order of values in value list is handled by change management via value order index.
Step 9: Create CRs for new CVAs
Create CR for new CVA for Block "Analog Signal Channel", Property "Signal Channel Type", Value "Analog".
Under menu entry Value, select function Create CVA. In the hierarchical structure, select property "Signal Channel Type" displayed under Block "Analog Signal Channel" and press button Select. In the New CVA dialog, select Value „Analog" as class-constant value by checking the check-box in front of it:
Fill in the mandatory field "Reason" and press button "Save".
A. Create CR for New CVA for Block "Binary Signal Channel", Property "Signal Channel Type", Value "Binary"
Under menu entry Value, select function Create CVA. In the hierarchical structure, select property "Signal Channel Type" displayed under Block "Binary Signal Channel" and press button Select. In the New CVA dialog, select Value „Binary" as class-constant value by checking the check-box in front of it.
Fill in the mandatory field "Reason" and press button "Save".
B. Create CR for New CVA for Block "Hybrid Signal Channel", Property "Signal Channel Type", Value "Hybrid"
Under menu entry Value, select function Create CVA. In the hierarchical structure, select property "Signal Channel Type" displayed under Block "Hybrid Signal Channel" and press button Select. In the New CVA dialog, select Value „Hybrid" as class-constant value by checking the check-box in front of it.
Fill in the mandatory field "Reason" and press button "Save".
Step 10: Create Reference Property Pointing to the Polymorphic Block
Under menu entry Property, select function Create Property. In the Create Property Dialog, fill in mandatory fields, select property data type „Reference" and then select CR for new block „Signal Channel" as referenced block. Press Save to save the CR for new reference property.
Via the created reference property „Signal Channel", the polymorphic block „Signal Channel" can be assigned wherever desired.
Creation of Advanced Polymorphic Structures
General Information
In the example above property "Signal Channel" can reference (using polymorphism) any specialization of "Signal Channel" block when products are created.
Suppose we would like to:
-
restrict number of specializations for property "Signal Channel" in products to Analog and Binary Signal Channels;
-
Make another property that can have only Analog and Hybrid Signal Channel when products are created out of the structure.
To achieve this we have to define list of values for reference properties and create values of type reference pointing only to the specializations that we want to make them available in products.
The modified structure will look like below:
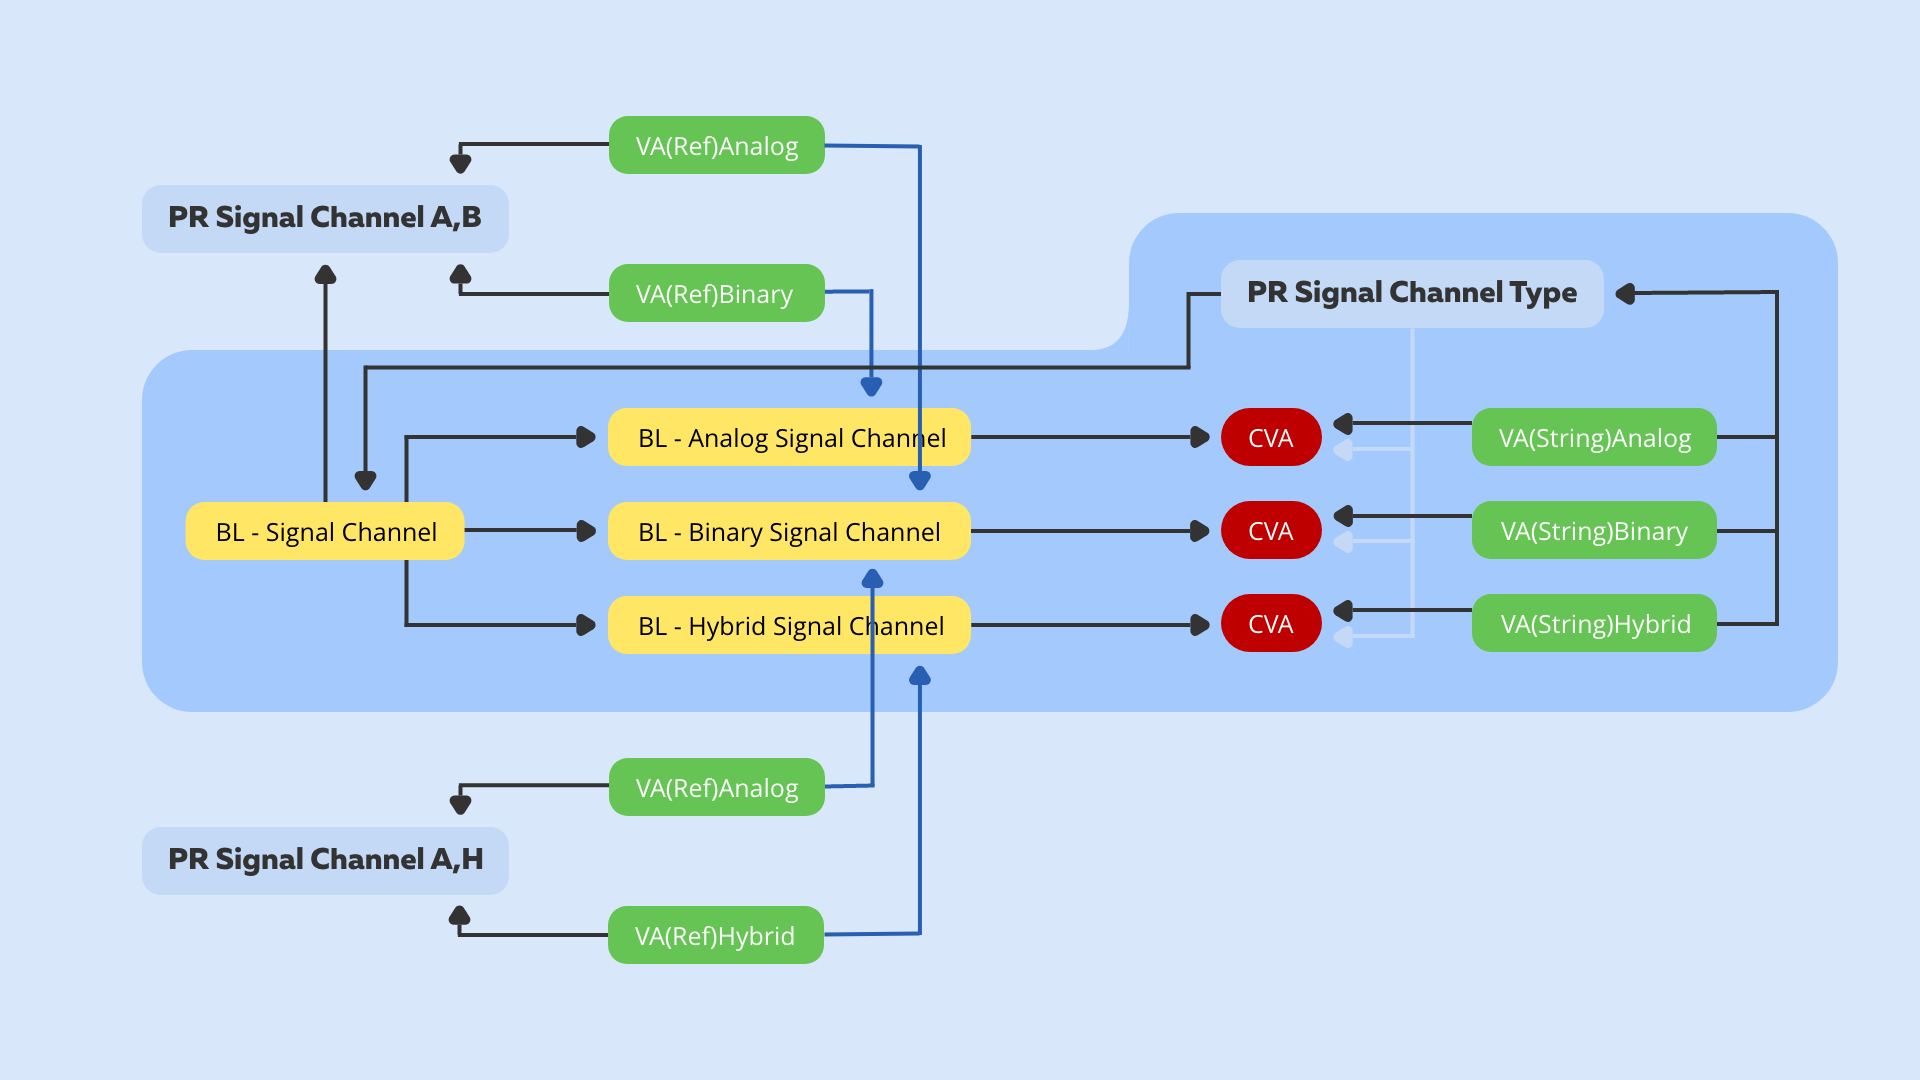
Display of Modified Structure
In order to achieve the above structure, follow the following steps:
Step 1: Create One or More Values with Data Type "Reference" Pointing to Specialized Block(s)
Select menu entry Value, function Create Value and press button "Create Value".
In the Create Value Dialog, fill in the mandatory fields and select data type "Reference".
Click link "Select referenced block" in order to select the specialized block to which the reference value points and press "Save" to save the CR.
The above steps should be performed in order to create further values with data type reference.
Step 2: Create Value List of Data Type Reference
Select menu entry Value List, function Create Value List and press button Create Value List.
In the Create Value List Dialog, fill in the mandatory fields, select data type "Reference" and value specification "Coded values".
In order to save the Value List, the user has to add at least one value to the value list. For this, press button „Add" and in the next dialog select one of the reference values created before:
Press button „Save" to save the CR.
Assign Reference Value(s) to Reference Value List
Select menu entry Value List, function Assing Value. In the next dialog, select the created Reference Value List by clicking on it and afterwards the created reference value(s) pointing to the specialized blocks to which the polymorphic structure will be restricted to.
Press Save to save the assignment.
Assing Reference Value List to Reference Property
Select menu entry Property, function Assign Value List. In the next dialog, select the created reference property (in our case "Signal Channel") and afterwards the created reference value list.
As final step, press Save in order to save the assignment.
Assign Reference Property to Block
Select menu entry Block, function Assign Reference of Block. System displays the hierarchical structure of elements. Select the block to which you want to assign the reference property (having a reference value list which restricts the polymorphic structure). In the next dialog select the reference property and save the CR. The advanced polymorphic structure will look as follows in the hierarchy: